> ## Documentation Index
> Fetch the complete documentation index at: https://docs.lovable.dev/llms.txt
> Use this file to discover all available pages before exploring further.
# Build an e-commerce store with Shopify
> Learn how to create a new Shopify store or connect an existing one to Lovable, then build and launch your storefront.
Lovable integrates directly with Shopify so you can **create a new Shopify store or connect an existing one**, then build, customize, and launch a complete e-commerce storefront using natural language. Shopify handles payments, inventory, and logistics when you go live.
## Use cases
With Lovable + Shopify, you can build and launch real online stores for:
* **Physical products**: sell clothes, gadgets, accessories, or home goods
* **Digital products**: offer e-books, courses, music, or software downloads
* **Niche brands**: quickly spin up stores for limited-edition merch, local products, dropshipping or side projects
* **Small businesses**: showcase bakeries, coffee shops, or craft businesses and accept orders online
* **Testing new product ideas**: add a few products and evaluate performance before full-scale production
* **Business expansion**: introduce new collections, seasonal campaigns, or bundles with just a prompt
## Before you begin
Before you start building your e-commerce store, here are a few important things to know:
* **New or existing Shopify stores**\
Lovable supports both **creating new Shopify stores** and **connecting existing Shopify stores**.
* **Sandbox store - no Shopify cost (new stores only)**\
When you create a new Shopify store in Lovable, Lovable automatically creates a **sandbox (development) store** so you can build and experiment safely at no Shopify cost. This environment is perfect for setup and testing, but it **won’t process real payments**.
* **Claiming your store (new stores only)**\
When you’re ready to launch your newly created store, you’ll need to **claim your store**. This migrates it to your Shopify account and starts a **30-day free Shopify trial**, and makes the claiming Lovable user the Shopify store owner. In Shopify, you need to activate payments and complete your store setup to start accepting real payments from your customers.
* **Required Shopify subscription**\
After the free trial period, you’ll need a **paid Shopify plan** to continue selling products online. This subscription is managed **directly through Shopify** and is **separate from Lovable pricing**.
* **Shopify review policy compliance**\
Before publishing your store, make sure all reviews are **authentic, unbiased, and compliant with** [**Shopify’s Review Policy**](https://help.shopify.com/en/partners/help-support/faq/reviews).
## Enable the Shopify integration
By default, the Shopify integration is enabled for your workspace. You can manage the Shopify integration behavior and related Shopify settings for your projects in **Settings → Connectors → Shared connectors → Shopify → Manage permissions.**
### Permission preferences
The default permission setting is **Ask each time**, meaning you decide whether to enable or disable the Shopify integration for each project. You can change your preference anytime from **Settings → Connectors → Shared connectors → Shopify → Manage permissions.**
Lovable prompts you when a Shopify integration is needed. You have three options:
* **Allow**: enable the integration for the current project.
* **Decline**: decline the integration for this request (you may be asked again later).
* **Adjust preferences**: change the default behavior for future projects (does not affect the current project).
## Shopify integration flow
Follow the steps below to build an e-commerce store with Shopify.
### Step 1: Start a project
You can start by:
* Creating a new project from scratch
* Remixing an existing project
Tell Lovable what type of store you want to create and specify Shopify.
For example:
```text wrap theme={null}
Build an e-commerce store with Shopify for selling handmade scented candles.
```
You can remix:
* **Shopify template projects**, see [Lovable + Shopify templates](https://lovable.dev/shopify)\
When remixing, prompt Lovable to integrate Shopify and remove mock data. It is important to use a good, comprehensive prompt.
```wrap theme={null}
I would like to replace the products in this store with my own products and create my Shopify store. Please proceed to:
1. Connect to Shopify.
2. Remove all mock product data from the store and create X new products with product images.
3. Update the product cards and product details page to use the new product information.
4. Update the product details page URL to match the new product.
5. Update the add to wishlist component and logic to match this change.
6. Update my cart, buy now CTA, and any related checkout actions on any page to reflect Shopify store integration.
```
* **Projects that were previously connected to a Shopify store**\
To remix a project with a connected Shopify store, you first have to [disconnect the Shopify store](#disconnect-a-shopify-store). Projects with an active Shopify connection can’t be remixed until the store is disconnected.
### Step 2: Create a new Shopify store or connect an existing one
In both of the above scenarios, the Agent prompts you to **enable the Shopify connection**. Click **Allow** and choose the Shopify setup.
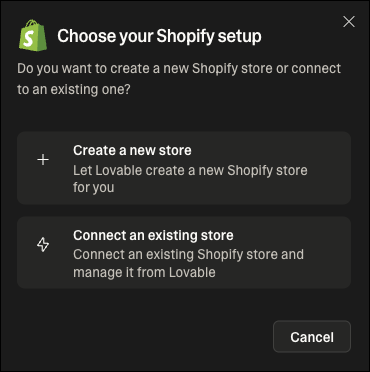 You can continue by creating a new Shopify store or by connecting an existing Shopify store you already own.
To create a new store, follow the steps below:
Select the country where your store will be based. This will be used to set the currency of your Shopify store.
Click **Create store**. Your sandbox store is now ready for setup. You can continue building your store as explained in the next steps.
Before the store is claimed, all collaborators in the project can use the Shopify integration with full read/write access.
To successfully connect an existing store, your Lovable account email must match the Shopify store owner's email.
To connect an existing Shopify store, follow the steps below:
Log into your [Shopify admin](https://admin.shopify.com/) and copy the URL from your browser, for example `https://admin.shopify.com/store/{your store}` . Enter the URL in Lovable.
Click **Connect store**. This takes you to Shopify.
Click **Install** to install the Lovable app to your Shopify store.
When the app is authorized, your Shopify store is connected and you are redirected back to Lovable. You can continue building your store as explained in the next steps.
* You can create, update, and delete products directly from the chat.
* You can prompt the Agent to fetch and display products from your existing store.
- Only the user who connected an existing store has write access (create, update, delete products, variants, and discount codes). Changes made by the user who connected the store will be reflected immediately in your Shopify store.
- Collaborators maintain read-only access to Shopify data (search and retrieve products, variants, and discount codes), but can still fully build the storefront.
### Step 3: Add products and product images
Start by adding products with a **name, description, and price**. For example:
```text wrap theme={null}
Add a product named Lavender Breeze Candle, description: ‘A calming handmade soy candle infused with lavender essential oils,’ price: $25.
```
You can edit details later. If your product doesn’t appear, prompt:
```text wrap theme={null}
Display the products on the website.
```
Then, enhance your listings with visuals using any of the below options. Always use representative images.
**Generate AI images**
```text wrap theme={null}
Add an AI-generated image to the product Lavender Breeze Candle.
```
**Upload or attach your own image**
```text wrap theme={null}
Add the attached image to the product Lavender Breeze Candle.
```
**Add image from URL**
```text wrap theme={null}
Add image from URL to the product Lavender Breeze Candle.
```
### Step 4: Manage your store
Manage your products and refine your store without leaving Lovable. For example, you can tell Lovable to:
* Update product names, descriptions, or prices
* Remove products
* Display all products
* Add product filtering functionality and create collections based on different categories
* Add product review functionality and only allow reviews on verified purchases
* Add percentage-based or fixed amount-based (USD) discount codes and include the validity period
* Add wishlist functionality and ability to share the wishlist
```text wrap theme={null}
Update the price of Lavender Breeze Candle to $28.
Change the description of Vanilla Bean Candle to highlight the wooden wick.
Remove the product Cinnamon Spice Candle.
Display all products.
Create a product review system and only allow reviews on verified purchases.
Create a 15% discount code for the product Lavender Breeze Candle. The code should be LAVENDER15 and valid until the end of November 2025.
Allow me to add products to the wishlist and share it.
```
### Step 5: Claim your Shopify store (new stores only)
* When the store is claimed, the Lovable user who claimed it becomes the Shopify store owner.
* Only the Lovable user who claimed the store has write access to the store.
* Collaborators maintain read-only access to Shopify data (search and retrieve products, variants, and discount codes), but can still fully build the storefront.
When you are ready to claim and launch your new store, be prepared to unlock your store, and set up and activate payments by completing the **KYC (Know Your Customer)** process. This may take some time.
Type `Claim the store`. Lovable prompts you to claim the store. Click **Claim**.
This opens Shopify in a new tab where you can log in and then complete the claim process. You may also get an email invitation to claim your store.
Accept the **Claim store** link from Shopify. This takes you back to your Lovable project.
In case the store claim verification fails, clicking **Try again** should resolve it.
Your Shopify store is ready. Go to [Shopify Admin](https://admin.shopify.com/) to complete your store setup and activate payments so you can begin selling. See [Shopify payments](https://help.shopify.com/en/manual/payments/shopify-payments/onboarding) for more information.
When you claim your store, Shopify assigns a permanent domain for your shop, which is used just for your backend. When you publish your project, your **real store URL** will be your `lovable.app` or your [custom domain](/features/custom-domain).
Only claim your store when you are fully ready to launch as you need a paid Shopify subscription after the 30-day free trial to continue selling products online.
### Step 6: Launch your store
When your store setup is complete, [publish your Lovable project](/features/publish) and share your store with the world.
At any time, directly from Lovable, you can:
* Create, update, and delete products
* Manage prices and descriptions
* Launch new collections, promotions, or bundles
## Disconnect a Shopify store
You can disconnect a Shopify store from a project at any time. This is useful when you want to:
* Remix the project (projects with a connected Shopify store cannot be remixed)
* Connect a different Shopify store
* Create a new Shopify store without starting a new project
Disconnecting removes the connection between your Lovable project and Shopify store. Your Shopify store and its data remain intact in Shopify, but your Lovable project is no longer tied to that store and can be reused freely.
There are three ways to disconnect:
* **Ask the agent**: Type a prompt like `Disconnect my Shopify store`
* **Shopify menu**: Click the Shopify icon in the navbar and select **Disconnect store** from the three dots menu
* **Project settings**: Go to **Project settings → Shopify** and click **Disconnect**
## FAQ
Yes. Lovable supports both **creating new Shopify stores** and **connecting existing Shopify stores**.
To connect an existing store, your **Lovable account email must match the Shopify store owner’s email**. When connected, you can manage products and build your storefront directly from Lovable.
This is usually a permissions issue:
* **Connected an existing store:** only the user who connected the store can make changes (create/update/delete products, variants, and discount codes).
* **Created a new store (not claimed yet):** all collaborators can make changes.
* **Created a new store (claimed):** the user who claimed the store becomes the Shopify store owner, and **only that user** can make changes.
Collaborators still have read-only Shopify access and can fully build the storefront in Lovable.
Sometimes Shopify can take a moment to finalize the claim. If verification fails, click **Try again** in Lovable to re-check the claim status. Retrying typically resolves the issue.
You cannot remix projects where the Shopify connection has been enabled. To remix a project with a connected Shopify store, first [disconnect the Shopify store](#disconnect-a-shopify-store).
You can also remix an existing Shopify template project to get started, see [Lovable + Shopify templates](https://lovable.dev/shopify).
Prompt the Agent to do the following:
```text wrap theme={null}
Please update the product URL logic to ensure that all new and future products in the store correctly display their respective product detail pages.
```
This should ensure that you won’t have any issues in the future. For all other issues, click **Try to Fix**, and the Agent will address and resolve the issue.
Prompt the Agent to update the pages where you’ve seen these products, for example:
```text wrap theme={null}
Clear the store from any existing products across all pages except for those that I added to my Shopify store.
```
You can continue by creating a new Shopify store or by connecting an existing Shopify store you already own.
To create a new store, follow the steps below:
Select the country where your store will be based. This will be used to set the currency of your Shopify store.
Click **Create store**. Your sandbox store is now ready for setup. You can continue building your store as explained in the next steps.
Before the store is claimed, all collaborators in the project can use the Shopify integration with full read/write access.
To successfully connect an existing store, your Lovable account email must match the Shopify store owner's email.
To connect an existing Shopify store, follow the steps below:
Log into your [Shopify admin](https://admin.shopify.com/) and copy the URL from your browser, for example `https://admin.shopify.com/store/{your store}` . Enter the URL in Lovable.
Click **Connect store**. This takes you to Shopify.
Click **Install** to install the Lovable app to your Shopify store.
When the app is authorized, your Shopify store is connected and you are redirected back to Lovable. You can continue building your store as explained in the next steps.
* You can create, update, and delete products directly from the chat.
* You can prompt the Agent to fetch and display products from your existing store.
- Only the user who connected an existing store has write access (create, update, delete products, variants, and discount codes). Changes made by the user who connected the store will be reflected immediately in your Shopify store.
- Collaborators maintain read-only access to Shopify data (search and retrieve products, variants, and discount codes), but can still fully build the storefront.
### Step 3: Add products and product images
Start by adding products with a **name, description, and price**. For example:
```text wrap theme={null}
Add a product named Lavender Breeze Candle, description: ‘A calming handmade soy candle infused with lavender essential oils,’ price: $25.
```
You can edit details later. If your product doesn’t appear, prompt:
```text wrap theme={null}
Display the products on the website.
```
Then, enhance your listings with visuals using any of the below options. Always use representative images.
**Generate AI images**
```text wrap theme={null}
Add an AI-generated image to the product Lavender Breeze Candle.
```
**Upload or attach your own image**
```text wrap theme={null}
Add the attached image to the product Lavender Breeze Candle.
```
**Add image from URL**
```text wrap theme={null}
Add image from URL to the product Lavender Breeze Candle.
```
### Step 4: Manage your store
Manage your products and refine your store without leaving Lovable. For example, you can tell Lovable to:
* Update product names, descriptions, or prices
* Remove products
* Display all products
* Add product filtering functionality and create collections based on different categories
* Add product review functionality and only allow reviews on verified purchases
* Add percentage-based or fixed amount-based (USD) discount codes and include the validity period
* Add wishlist functionality and ability to share the wishlist
```text wrap theme={null}
Update the price of Lavender Breeze Candle to $28.
Change the description of Vanilla Bean Candle to highlight the wooden wick.
Remove the product Cinnamon Spice Candle.
Display all products.
Create a product review system and only allow reviews on verified purchases.
Create a 15% discount code for the product Lavender Breeze Candle. The code should be LAVENDER15 and valid until the end of November 2025.
Allow me to add products to the wishlist and share it.
```
### Step 5: Claim your Shopify store (new stores only)
* When the store is claimed, the Lovable user who claimed it becomes the Shopify store owner.
* Only the Lovable user who claimed the store has write access to the store.
* Collaborators maintain read-only access to Shopify data (search and retrieve products, variants, and discount codes), but can still fully build the storefront.
When you are ready to claim and launch your new store, be prepared to unlock your store, and set up and activate payments by completing the **KYC (Know Your Customer)** process. This may take some time.
Type `Claim the store`. Lovable prompts you to claim the store. Click **Claim**.
This opens Shopify in a new tab where you can log in and then complete the claim process. You may also get an email invitation to claim your store.
Accept the **Claim store** link from Shopify. This takes you back to your Lovable project.
In case the store claim verification fails, clicking **Try again** should resolve it.
Your Shopify store is ready. Go to [Shopify Admin](https://admin.shopify.com/) to complete your store setup and activate payments so you can begin selling. See [Shopify payments](https://help.shopify.com/en/manual/payments/shopify-payments/onboarding) for more information.
When you claim your store, Shopify assigns a permanent domain for your shop, which is used just for your backend. When you publish your project, your **real store URL** will be your `lovable.app` or your [custom domain](/features/custom-domain).
Only claim your store when you are fully ready to launch as you need a paid Shopify subscription after the 30-day free trial to continue selling products online.
### Step 6: Launch your store
When your store setup is complete, [publish your Lovable project](/features/publish) and share your store with the world.
At any time, directly from Lovable, you can:
* Create, update, and delete products
* Manage prices and descriptions
* Launch new collections, promotions, or bundles
## Disconnect a Shopify store
You can disconnect a Shopify store from a project at any time. This is useful when you want to:
* Remix the project (projects with a connected Shopify store cannot be remixed)
* Connect a different Shopify store
* Create a new Shopify store without starting a new project
Disconnecting removes the connection between your Lovable project and Shopify store. Your Shopify store and its data remain intact in Shopify, but your Lovable project is no longer tied to that store and can be reused freely.
There are three ways to disconnect:
* **Ask the agent**: Type a prompt like `Disconnect my Shopify store`
* **Shopify menu**: Click the Shopify icon in the navbar and select **Disconnect store** from the three dots menu
* **Project settings**: Go to **Project settings → Shopify** and click **Disconnect**
## FAQ
Yes. Lovable supports both **creating new Shopify stores** and **connecting existing Shopify stores**.
To connect an existing store, your **Lovable account email must match the Shopify store owner’s email**. When connected, you can manage products and build your storefront directly from Lovable.
This is usually a permissions issue:
* **Connected an existing store:** only the user who connected the store can make changes (create/update/delete products, variants, and discount codes).
* **Created a new store (not claimed yet):** all collaborators can make changes.
* **Created a new store (claimed):** the user who claimed the store becomes the Shopify store owner, and **only that user** can make changes.
Collaborators still have read-only Shopify access and can fully build the storefront in Lovable.
Sometimes Shopify can take a moment to finalize the claim. If verification fails, click **Try again** in Lovable to re-check the claim status. Retrying typically resolves the issue.
You cannot remix projects where the Shopify connection has been enabled. To remix a project with a connected Shopify store, first [disconnect the Shopify store](#disconnect-a-shopify-store).
You can also remix an existing Shopify template project to get started, see [Lovable + Shopify templates](https://lovable.dev/shopify).
Prompt the Agent to do the following:
```text wrap theme={null}
Please update the product URL logic to ensure that all new and future products in the store correctly display their respective product detail pages.
```
This should ensure that you won’t have any issues in the future. For all other issues, click **Try to Fix**, and the Agent will address and resolve the issue.
Prompt the Agent to update the pages where you’ve seen these products, for example:
```text wrap theme={null}
Clear the store from any existing products across all pages except for those that I added to my Shopify store.
```