> ## Documentation Index
> Fetch the complete documentation index at: https://docs.lovable.dev/llms.txt
> Use this file to discover all available pages before exploring further.
# Set up payments with Stripe
> Add one-time payments or subscriptions to your app using chat-driven Stripe integration with Supabase Edge Functions.
Lovable now lets you set up Stripe entirely through **chat**.
**Chat‑driven auto‑setup (recommended)**\
After you connect **Supabase** and save your **Stripe Secret Key** via **Add API Key**, just describe what you need:
* “Add three subscription tiers …”
* “Create a one‑time checkout for my e‑book at \$29”\
Lovable generates the checkout / portal edge functions, database tables with RLS, and UI buttons—no manual coding or webhooks unless you ask for them.
- For **one‑off sales**, be sure your cart or product page already works.
- For **subscriptions**, confirm Supabase Auth is in place so Lovable can link Stripe customers to each user’s **id**
### Key takeaways
* Use the **chat‑driven flow** for both subscriptions and one‑off payments.
* **Never paste your Stripe Secret Key in chat.** Configure it via the in-chat **Add API Key** form.
* **Webhooks are opt‑in.** Lovable relies on edge‑function polling unless you request webhooks.
* Debug in **Browser Console → Network/Errors**, **Supabase → Edge Functions → Logs**, and **Stripe Dashboard → Logs**.
* Always test in **Stripe Test Mode**, then deploy.
## Requirements
Before integrating Stripe, ensure the following prerequisites are met:
* The project **must** be connected to Supabase. [Learn more about Supabase](https://docs.lovable.dev/integrations/supabase)
* A **Stripe account** with properly configured products.
* A working **frontend and backend**:
* For individual product sales, ensure a shopping cart and checkout page are functional.
* For subscriptions, set up login functionalities and different pricing tiers.
**Please note** Stripe integration doesn't work in preview. To test the integration, make sure to deploy. You should also make sure to be in test mode in Stripe when trying out the functionality. When testing payment, card number: 4242 4242 4242 4242, any 3 digits as CVC and any future date will work as a card.
## Stripe payment setup (No‑code chat flow)
Lovable now generates all Stripe logic for you. Once your **Stripe Secret Key** is configured via the in-chat **Add API Key** form and your project is **connected to Supabase**, simply tell Lovable what you need in chat—no manual Payment Links required.
**Prep your project**
* Supabase connected
* Stripe Secret Key added via the in-chat **Add API Key** form
* (Optional) Prices or product IDs handy
Examples:
* Create a one-time checkout for my "Digital Course" at \$29
* Set up an annual Premium plan for \$99, tied to each user's id
**Review & apply** Lovable auto‑scaffolds the Edge Functions, database tables, and UI components (all tied to the user's id in Supabase). Check the preview, then click **Apply** to deploy.
* Subscriptions should always linked to the authenticated user’s `id` in Supabase for secure, role‑based access.
## Advanced integration: Webhooks & Supabase
For complex payment structures such as **subscriptions and role-based access**, Lovable recommends using **Supabase** to securely handle Stripe integration. This allows for proper webhook handling, subscription management, and role-based access control based on payment tiers.
The Edge Function that handles the necessary changes to the user account should be set up automatically by the AI.
Getting started is simple. Lovable makes connecting Supabase effortless with a built-in native integration:
1. Click the **Supabase button** in the top-right corner of Lovable.
2. Follow the instructions to link your project.
3. Once connected, Supabase enables secure payment processing, subscription management, webhook handling, customer data storage, and error handling.
Initiate the process by prompting Lovable:
Let's connect Stripe to my project. We will begin with secure payment processing.
Lovable will generate the necessary SQL schema for handling payments. This includes database tables for users, subscriptions, and payments. You can review and customize these tables to fit your specific product needs before applying changes.
**Edge Functions** in Supabase act as small, high-performance serverless functions that run close to the user, ensuring fast responses. They help process webhook events, such as payment confirmations, before updating the database.
**Retrieve the Endpoint URL** from the Edge Function in Supabase.
**Go to Stripe Dashboard** > Developers > Webhooks > Create an Event Destination.
**Select Webhook Events** that align with your project needs:
* `payment_intent.succeeded`
* `payment_intent.payment_failed`
* `customer.subscription.created`
* `customer.subscription.updated`
* `customer.subscription.deleted`
**Enter the Endpoint URL** from Supabase.
**Copy the Webhook Secret** and store it securely in **Supabase → Edge Functions → Manage Secrets → Add New Secret**.
If unsure about naming the secret, ask Lovable in **Plan mode** for guidance.
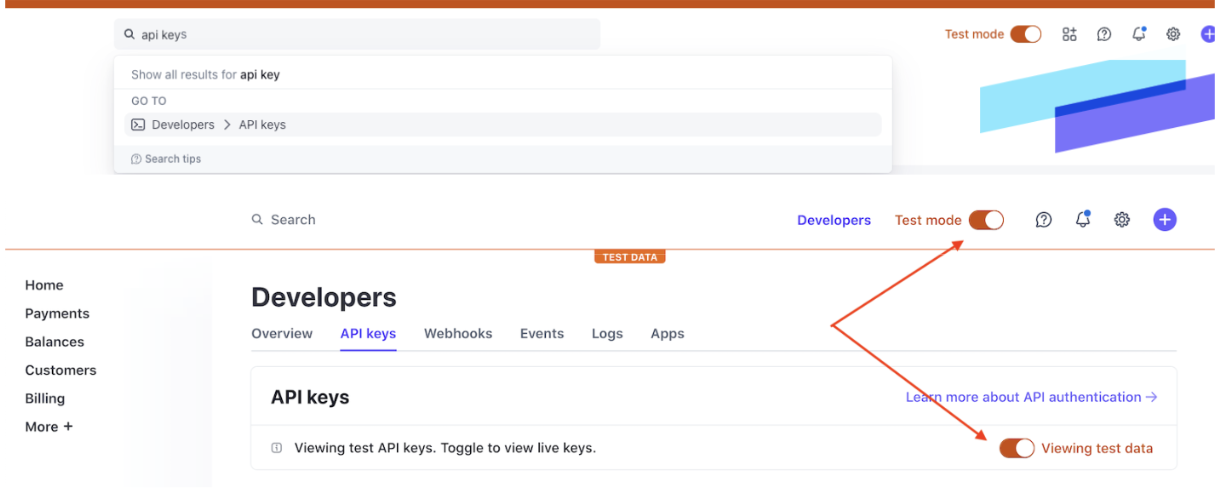
To integrate Stripe securely, avoid sharing your API key directly in chat. Instead:
.png?fit=max&auto=format&n=iHmie2cDncPAjYRf&q=85&s=14f9f256b736a98c9501a82412c0a903) **Go to Stripe Dashboard** > Developers > API Keys.
**Copy the Secret Key** (DO NOT paste it directly in Lovable chat).
**Use the Lovable "Add API Key" feature** to securely store it.
**Important Security Warning**
Never paste your **Secret Key** directly in Lovable chat. Treat it like the keys to your house—exposing it could allow unauthorized access to your Stripe account. Instead, store it securely using Lovable's API key feature.
* **Use Stripe's Test Mode** to safely test payments.
* **Test card details**:
* Card Number: `4242 4242 4242 4242`
* Any future expiration date
* Any 3-digit CVC
* **Deploy your app**—Stripe integration does not work in preview mode.
## Debugging & Troubleshooting
Open **Developer Tools** (Right-click > Inspect > Console in Chrome).
Look for errors and review webhook event logs.
Copy error messages and ask Lovable for debugging assistance.
Go to **Supabase Dashboard**
Edge Functions
Logs to check for webhook errors.
Navigate to **Stripe Dashboard**
Webhook logs
Confirm that Stripe is sending data correctly.
Switch to **Plan mode** and ask Lovable follow-up questions.
Ask Lovable follow-up questions.
Use the **Rubber Duck Method** & explain your issue step by step to clarify the problem.
**Go to Stripe Dashboard** > Developers > API Keys.
**Copy the Secret Key** (DO NOT paste it directly in Lovable chat).
**Use the Lovable "Add API Key" feature** to securely store it.
**Important Security Warning**
Never paste your **Secret Key** directly in Lovable chat. Treat it like the keys to your house—exposing it could allow unauthorized access to your Stripe account. Instead, store it securely using Lovable's API key feature.
* **Use Stripe's Test Mode** to safely test payments.
* **Test card details**:
* Card Number: `4242 4242 4242 4242`
* Any future expiration date
* Any 3-digit CVC
* **Deploy your app**—Stripe integration does not work in preview mode.
## Debugging & Troubleshooting
Open **Developer Tools** (Right-click > Inspect > Console in Chrome).
Look for errors and review webhook event logs.
Copy error messages and ask Lovable for debugging assistance.
Go to **Supabase Dashboard**
Edge Functions
Logs to check for webhook errors.
Navigate to **Stripe Dashboard**
Webhook logs
Confirm that Stripe is sending data correctly.
Switch to **Plan mode** and ask Lovable follow-up questions.
Ask Lovable follow-up questions.
Use the **Rubber Duck Method** & explain your issue step by step to clarify the problem.