

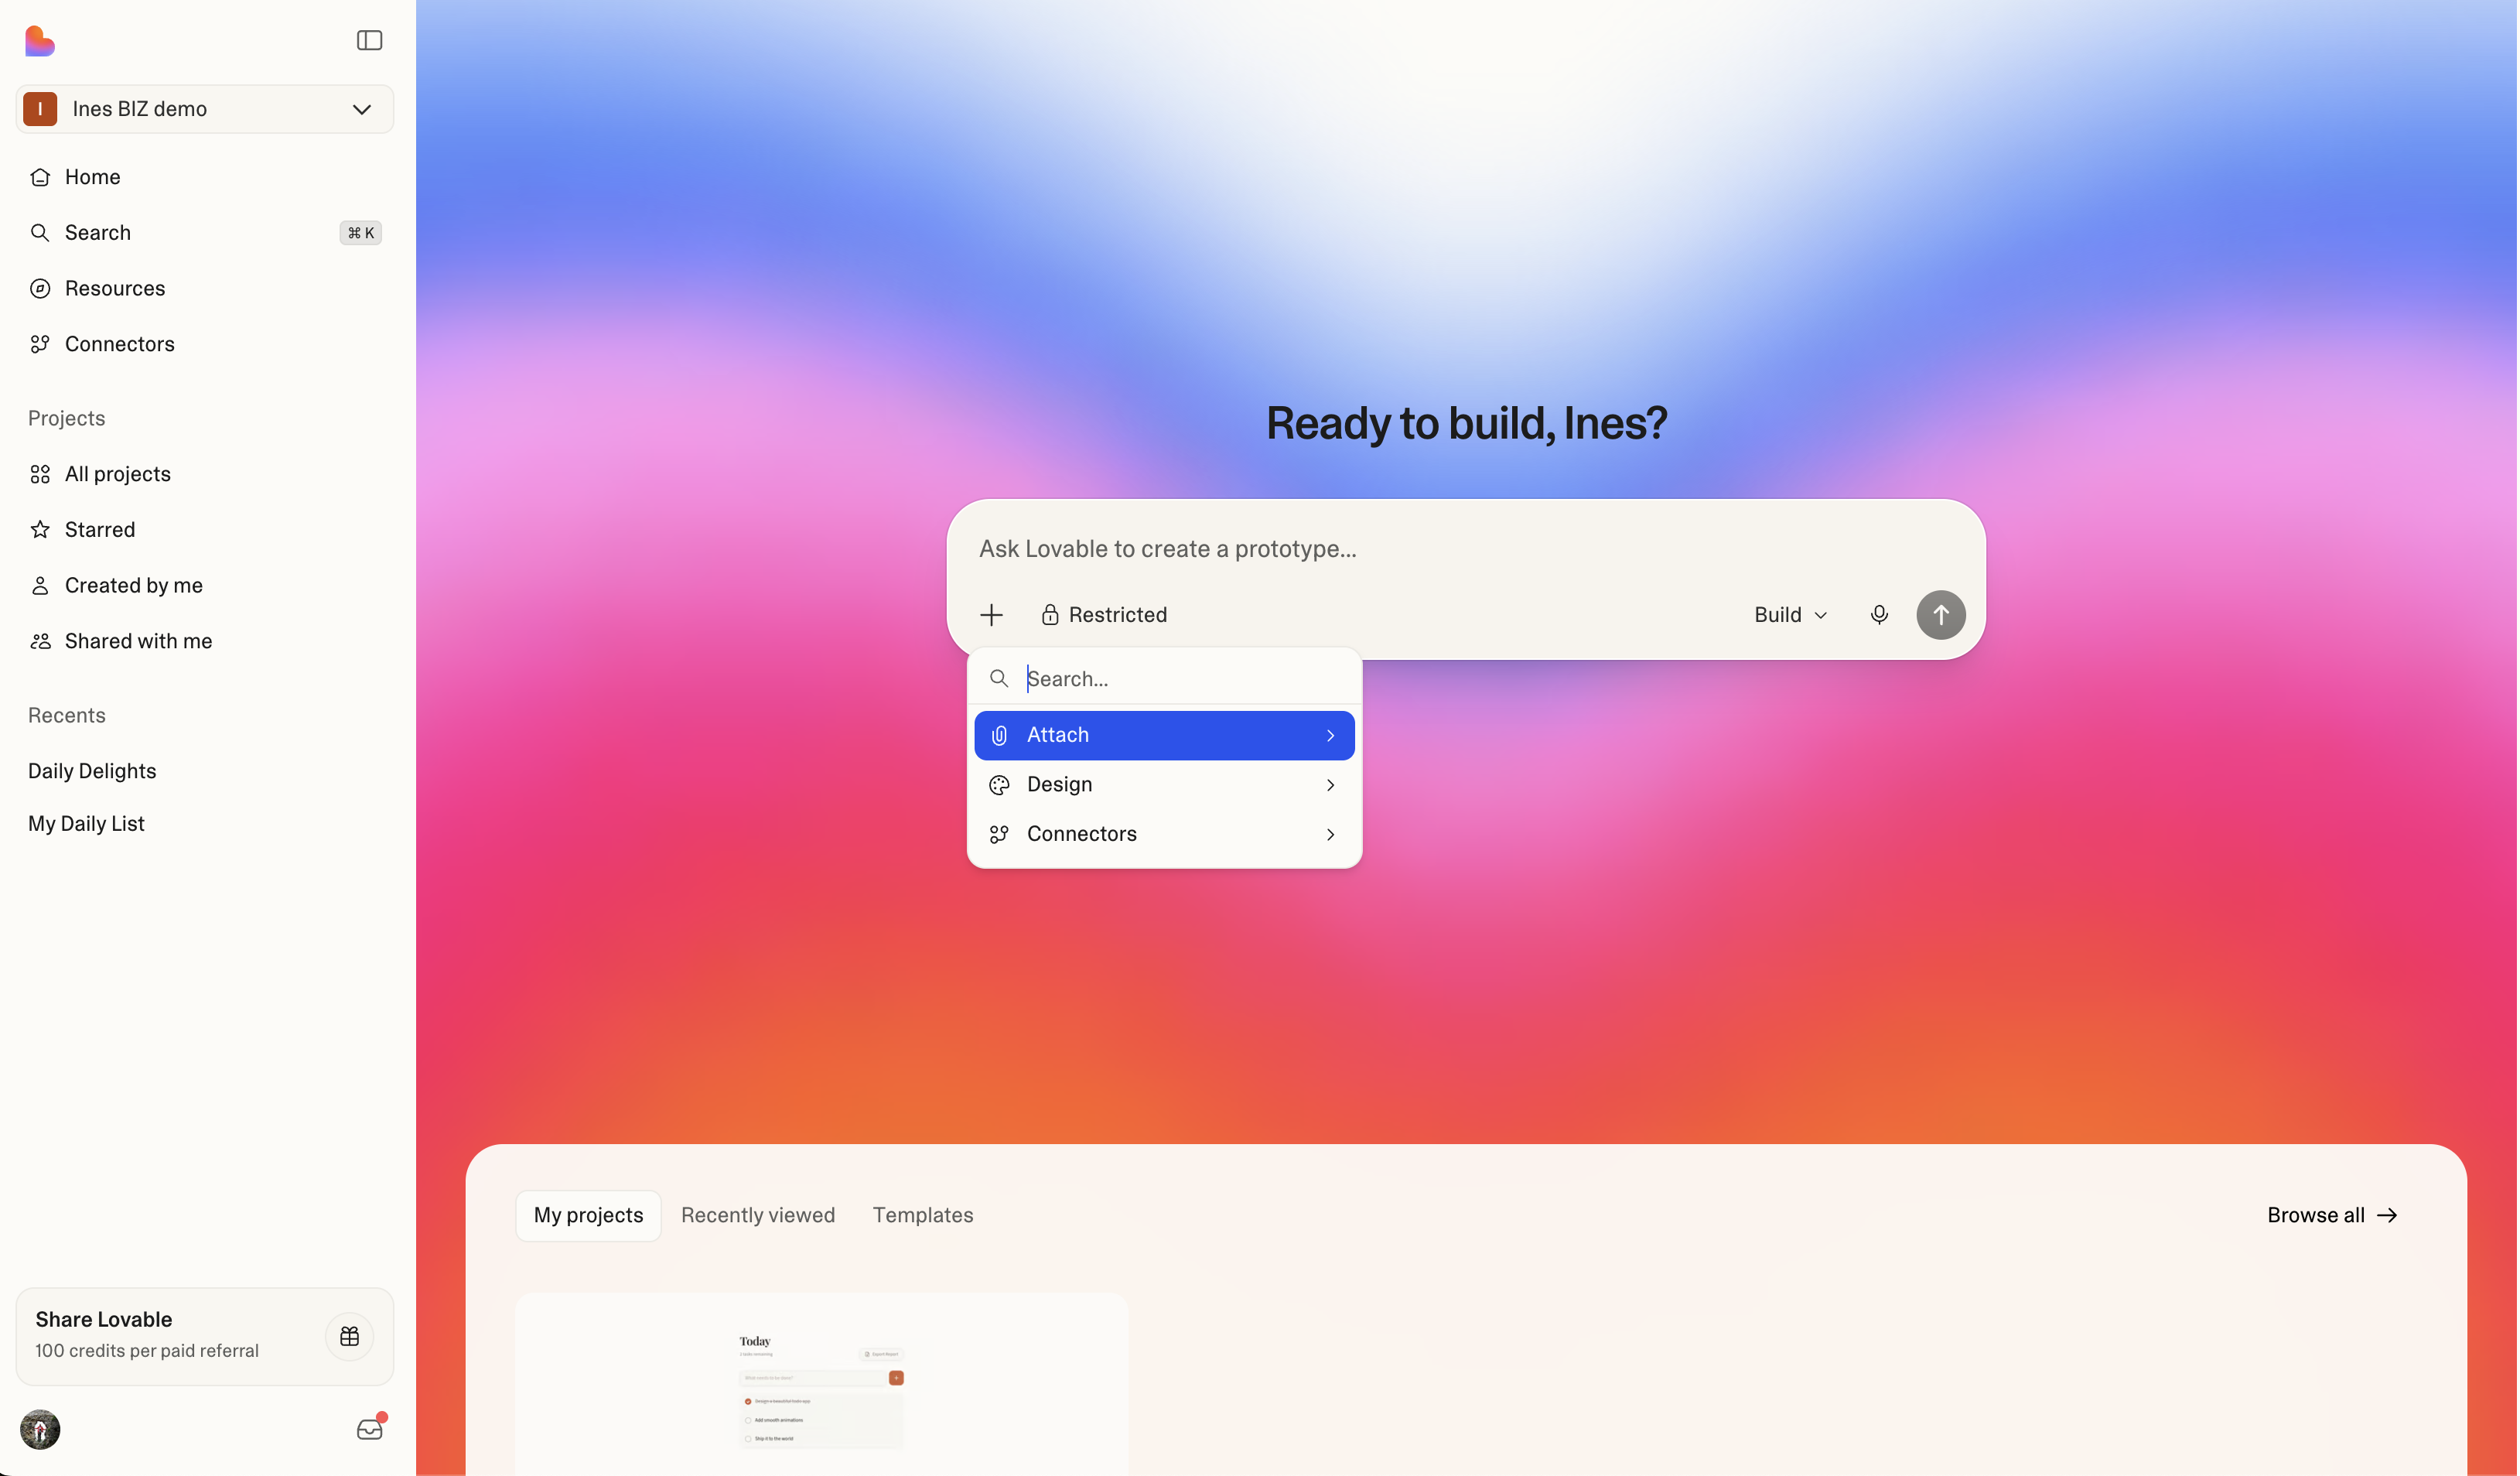
Starting a new project or chat
The prompt input box is in the center of the dashboard. With Build selected in the mode picker, type a description of what you want to build and click send to create a new project. With Chat selected, your message starts a chat instead. See Quick start for more information. For every way to start a project, see Ways to create a project.The prompt input
Type your idea into the text field or click the microphone button to use voice input and dictate your prompt. Lovable uses your description to generate a working app. You can be as brief or detailed as you like, for example,a todo app with dark mode or a multi-paragraph specification.
See Prompting best practices for more information, and the prompt library for ready-made prompts for common features.
The + menu
Click the + button to the left of the input to access additional options:
- Import project to Lovable: Bring an app you built in another tool, or a website you own, into Lovable. See Import a project from another tool and Import a website
- Attach: Upload images or files to include as context for your project or capture and attach a screenshot for Lovable to reference
- Design: Choose from the design template library to start with a pre-built foundation (Business and Enterprise plans) or select a design system to apply consistent styling (all paid plans). If your workspace or group has a default design system, Lovable pre-selects it. To remix a ready-made app on any plan, use the Lovable templates tab on the dashboard, or lovable.dev/templates, instead
- Connectors: Connect chat connectors (MCP servers) for context while you build, and manage connectors for your apps
- Databases: Connect the built-in backend (Cloud) or Supabase for database and backend services
Project access
Project access defaults to workspace on all plans and can be managed from the Share button in the top bar of any project. Additionally, on Business and Enterprise plans, you can adjust project access even before creating the project. See Project access and Share a project for more information.Choose a mode: Build, Chat, or Plan
Use the mode picker next to the send button to choose what your message starts:- Build (Make changes directly): Create a new project and have Lovable build it. Build is selected by default, and Lovable remembers the mode you pick in this browser.
- Chat (Ask anything, explore ideas): Start a chat outside your projects to think through an idea, ask a question, or work with your apps and connected tools. The send button reads Chat for free while your workspace’s daily chat allowance lasts, and the waveform button starts a voice conversation. Project options are hidden while Chat is selected.
- Plan (Detailed spec for complex builds): Create a new project and start it in Plan mode, so Lovable investigates and writes a plan without changing code.
Sidebar and navigation
The sidebar on the left gives you access to everything in your workspace. The same sidebar is available inside the editor, so you can navigate without leaving a project. To collapse or expand the sidebar, click the button at the top of the sidebar or press[. You can also press Cmd+B (Mac) or Ctrl+B (Windows/Linux).
Navigation items show tooltips on hover when the sidebar is collapsed.
Workspace selector
At the top of the sidebar, click your workspace name to switch between workspaces you belong to, or select Workspace settings in that menu to open the workspace settings. Each workspace has its own projects, members, and billing. Learn more about workspaces in Lovable workspace.Navigation
- Dashboard: Return to the dashboard
- Chats: Open Chats, the list of your conversations with Lovable outside your projects. This item appears once you have started a chat.
- Search: Open the command palette to find projects, folders, and settings. Keyboard shortcut:
Cmd+K(Mac) orCtrl+K(Windows/Linux). - Connectors: Browse and manage available app and chat connectors
Projects, Starred, and Recents
- Projects: Opens the full projects list, where you can filter by owner and browse your folders. See Find and search projects.
- Starred: Projects and chats you have starred, for quick access. This section appears once you have starred something.
- Recents: The projects and chats you opened last, ordered by last access time. Use the filter next to the heading to show All, Chats, or Projects. All projects at the bottom of the list opens the full projects list.
Share Lovable
Available on Free, Pro, and Business plans in the web app. Not available on Enterprise plans or in the mobile app. Select the referral card at the bottom of the sidebar to open a dialog with your workspace’s invite link and a QR code. Copy the link or share it directly from the dialog. On a phone, open the user menu on the dashboard or the project menu in the editor and select Get free credits to open the same dialog. Lovable grants two separate rewards through the referral program:
A signup alone does not earn you credits.
Rewards follow these rules:
- The person you invite must be new to Lovable and sign up through your invite link. Lovable cannot add a referral afterwards, so someone who signed up without your link does not count, even if you add them as a member of your workspace later. A person can use only one invite link.
- Each invited person earns you one reward, granted on their first payment.
- The invite link belongs to your workspace, and anyone in the workspace can share it. Lovable does not count you or the other members of your workspace as referrals.
- Up to 100 people can sign up through your workspace’s link in total. Lovable also limits signups to 5 per day on Free workspaces and 15 per day on Pro workspaces. Business workspaces have no daily limit.
- Lovable checks both your email address and the invited person’s. It rejects disposable addresses and addresses that contain a plus sign, such as
name+tag@example.com. - Lovable withholds rewards when it detects suspicious activity, such as duplicate accounts. Lovable also removes a reward when the payment that earned it is fully refunded.
Upgrade plan
If you’re on a Free or lower-tier plan, an upgrade card appears in the sidebar. Click it to view available plans and upgrade your workspace for more credits and features. See Subscription plans for more information.Manage projects from the dashboard
Your projects appear as cards. Each card shows the project’s name and a preview, and a Published badge appears when the project is live and links to the published app. Hover over a card to star the project or open its ⋯ menu. On desktop, you can also right-click a card to open the same menu. Related actions are grouped under Copy, Open, Move, and Edit:- Open in new tab: Open the project in a new browser tab. In the desktop app, this action is Open project.
- Chat about this project: Start a chat about the project instead of opening it. The dashboard prompt box opens in Chat with the project attached and a suggested message that you can edit or send. Available to editors, admins, and owners. See Start a chat.
- Star or Unstar: Add the project to your Starred list, or remove it.
- Remix: Create an independent copy of the project. See Remix a project.
- Copy → Project link: Copy a link to the project in Lovable.
- Copy → App link: Copy the published app’s URL. Available when the project is published.
- Open → Published app: Open the live app. Available when the project is published.
- Open → Analytics: Open your published app’s analytics. Available when the project is published.
- Move → To folder: Organize the project into a folder.
- Move → To workspace: Move the project to another workspace. See Move a project to another workspace.
- Edit → Name: Rename the project. Renaming changes only the display name, not the project’s URL.
- Edit → Thumbnail: Change the preview image shown on the project card.
- Settings: Open Project settings.
- Delete: Delete the project. You can restore it for 60 days. See Delete a project.
Select several projects at once
On desktop, click and drag across an empty area of the project list to select multiple projects, or press Ctrl+A (Cmd+A on Mac) to select all. On touch devices, press and hold a card. A toolbar appears with the actions you can run on the selection:- Move to folder, or Remove from folder when you’re inside a folder
- Transfer the selected projects to another workspace
- Change owner of the selected projects, handing them all to another workspace member at once. See Change the owner of several projects.
- Unpublish the selected projects, taking their live apps offline at once. The action sits in the toolbar’s ⋯ menu, and it appears when you can unpublish at least one of the selected projects. Lovable lists the projects it includes and the ones it excludes, with the reason, and unpublishes only the included ones. See How to unpublish your project.
- Delete the selected projects. This appears only when you can delete everything you selected: projects you own, or any project if you’re a workspace owner. You can restore deleted projects for 60 days.
- Unstar, when selecting projects in your Starred list
Change the owner of several projects
Instead of opening each project’s settings, select the projects, choose Change owner in the toolbar, select a member under New owner, and confirm. For who can become an owner and what happens to your own access afterwards, see Transfer project ownership. Workspace owners can change owners in bulk on any plan, and workspace admins can on Pro, Business, and Enterprise plans. If you own a project but aren’t a workspace admin or owner, you can still transfer it individually from project settings. Before you confirm, the dialog shows how many of the selected projects will be transferred. If some of them can’t be transferred, the rest still get the new owner.User menu
Click your avatar at the bottom-left of the sidebar to open the user menu. A badge on the avatar shows how many notifications are waiting for you. The menu contains:- Profile: View your public profile page.
- Inbox: Open your notifications. See Inbox and notifications.
- Account settings: Open your account settings in a dialog: profile, preferences, security, and devices and apps. Shortcut:
Cmd+.(Mac) /Ctrl+.(Windows/Linux). Workspace settings are not here: open them from the workspace switcher at the top of the sidebar. - Appearance: Customize how Lovable looks.
- Theme: Switch between system, light, or dark (system follows your OS preference).
- Dashboard background: Choose a visual theme for the dashboard background.
- Support: Open the Help center, Report abuse, or check the Status page for platform incidents.
- Documentation: Open the Documentation, the Prompts library, Terms & privacy, the Changelog, the Security docs, or the Platform rules.
- Community: Visit the Lovable community.
- Download apps: Get the Lovable desktop and mobile apps. See Desktop app and Lovable mobile app.
- Homepage: Go to lovable.dev.
- Log out: Log out of your account.
Inbox and notifications
Open the user menu from your avatar and select Inbox to open the notification panel. A count badge on your avatar shows unread items, and a red dot indicates new notifications.Inbox tab
The Inbox tab shows pending actions that need your attention:- Workspace invitations: Accept or decline invitations to join a workspace
- Project invitations: Accept or decline invitations to collaborate on a project
- Project access requests: Approve or deny requests from others wanting access to your projects
- Workspace access requests: Approve or deny requests from others wanting to join your workspace
- General notifications: System notifications
What’s new tab
The What’s new tab shows feature announcements and product updates, including:- New integration launches and connector availability
- Product feature releases
- New Lovable changelog announcements